
Fiber-Optics Connected to Barn

I’m on the information superhighway again. Yippie!
Finally, after getting electric service hooked up to the barn (see earlier post) and everything cleaned up inside, logically, the next item to accomplish was to bring in a high speed internet connection and set up wireless access across the homestead. How, after all, am I going to build a “smart tiny house” without internet access??
 As with all of the projects I embark on these days, this one took more time and money than had originally been budgeted. But that is perfectly fine. I got way more than originally planned with a clear path for future upgrades. I learned a few lessons along this journey and I’ll share them here.
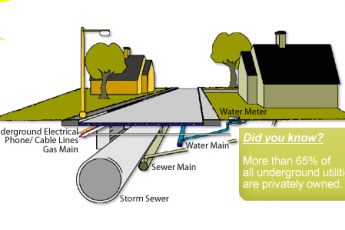
First, in a nutshell, this is the design: a) Comcast currently delivers high speed TV/Internet service to the house. b) The original power from the house to the barn was eliminated and replaced with a new 200 amp service. c) the original electric wires from the house to the barn ran through a 2″ conduit buried 18 inches underground and were removed when the new service hookup was completed. d) the conduit is over 100 feet long (the barn is quite a distance from the house). e) When I had the electric wires removed by the electrician, I asked him to fish in a thick rope so I could pull in other cables myself. f) I ordered 500 feet of rg-6 external grade cable tv wire and external/commercial grade cat-6e Ethernet wire from amazon in prep for this installation. f) Doing research, I decided to go with fiber optic connection between buildings. f) I pulled Cat-6E (Ethernet), RG-6 (Cable TV/Video) and 100 meters of per-terminated LC-LC single mode, duplex fiber through the conduit in prep for connection. g) I connected it all up.
My first thought was I’d simply pull Ethernet to the barn from the house. At the same time, I figured I’d also pull Cable TV/Video cable in case I needed it. I decided that I would cut and terminate each of those to length and it would be nice and neat when finished. As I already pay for high-speed Comcast service at the house, it didn’t make sense to have them install new service to the barn… It would be very expensive. I decided that I’d just piggyback on the existing service.

Lightning storm over city in purple light
You may be asking, where did the fiber-optic idea come into play? Well, being an engineer by trade, I know by personal experience that lightning and sensitive networking electronics don’t play well together. I have seen the results of network equipment being destroyed as a result of lightning strikes connected to Ethernet cables. Combine that with the fact that the homestead is in South Florida, and there are hundreds of lightning strikes each year, and that the new cables would be buried in the ground (in a conduit), I started looking at Ethernet/lightning mitigation techniques.
As you can imagine, there are many stories online about campus wide Ethernet systems and the horror stories relating to lightning. To make a long story short, after reading about the hazards and the science of cable running through the ground being energized by lightning, I decided that going with fiber is the smartest way to go. By using fiber instead of “wire”, I would eliminate the need for special grounding techniques, allow me to deliver very high speed connection between the house and the barn with virtually no data loss due to the distance, and give me a future upgrade path if needed. Single mode fiber can be run for miles with no issues.
Step 1: Get everything through the conduit – From House to Barn
Pulling cable is really straight-forward and I don’t need to talk about it that very much – but there are a few things to remember. First, most fiber cable is actually stronger then copper Ethernet wire. In fact, most can stand 300 pounds per inch or more of pulling. Check the specs when ordering. The only thing to really be careful about is hard bends which will break the glass and pulling/stretching the terminated ends themselves. I purchased a complete cable assembly with the lc connectors already attached so not to have to think about how to terminate and attach them.
The Video and Ethernet cables were both on rolls, so I built a small stand out of cinder blocks and a broomstick to allow the cables to flow off the rolls easily. Unfortunately, this was not the case with the fiber cable. It wasn’t on a roll. For that, I stretched it out in a very long figure-8 pattern along the ground to make sure it would be able to be pulled easily without knotting. This worked.
From the house, I tethered the Video and Ethernet cables tethered together with tape and then taped the fiber to it. I went about 12 inches down from the connectors with tape on the fiber so not to worry about stretching. Then I connected it to the rope which was sticking out of the conduit at the house with a ton more tape. Of course, I added a bit of cable lubrication to it just in case. Then, I went over to the barn and started pulling the rope carefully and slowly.
Yes, it would have been nice to have a helper. Each time the cable seems to “stick” in the conduit as I was pulling, I ran back and forth between the house and barn to check. Hot/sticky humid South Florida day… I was drenched by the time I was done.
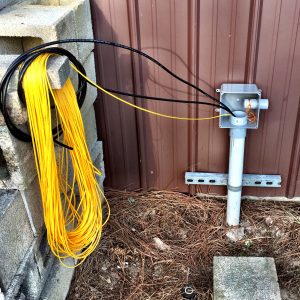
conduit outside the barn
When the cable bundle exited the ground, I had to decide how much to keep at each end. For the Video and Ethernet cables, that was easy. I could just keep them short. All I needed to do was have them be long enough to enter the barn and roll up. If I decide to use them in the future, I’ll simply add connectors to them and connect as needed. For the fiber, however, as it was pre-terminated, I decided to pull more through and have equal amounts at each end of conduit.
The end result was two long bundles of fiber rolled up at both the house and the barn. See photos above for w hat I mean.
Lesson 1: Purchase the correct length of pre-terminated fiber.
Although the data integrity doesn’t diminish with extra fiber length, it can get tangled easily!!! I bought 100 meters of fiber – which turned out to be more then three times the length needed. As you can imagine, it was tricky not to get it tangled up when working with it on each end.
Step 2: Connecting to the network in the barn
Now that the fiber (and the rest of the cables) was day-lighting at the barn, I had to plan how to best get it all to the network rack (which was on the other side of the barn).
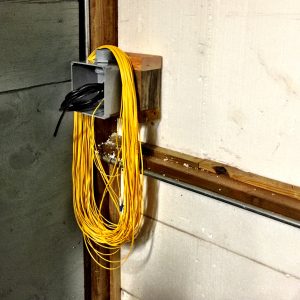
fiber, cable and cat-6e enters the barn from outside
The first thing I did was build a network termination (NT) box inside. I wanted to make sure that the cable/fiber was easily accessible and safe from within the barn. I needed piping and raceways to make sure everything was neat and secure. I ran PVC pipe up from the NT box to the rafters (which are exposed). Then, I ran another schedule-80 pvc pipe (2″) from the network rack up into the rafters.
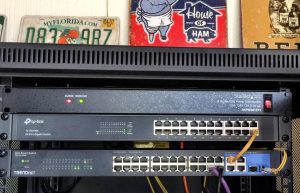
Fiber connected to Ethernet switch in the barn
My thinking is that as I build out the barn, I’ll need places to place any networking cables in the future. Also, of course, I wanted to protect the fiber as best I could.
I decided to purchase some network raceway from amazon and put them up in the rafters all the way across the barn. In it, I pulled the Video, Ethernet, and fiber from where it entered the barn to the network switch.
Finally, I connected the GBIC to the switch and plugged in one end. The Ethernet switch I purchased for the barn had a couple of high speed GBIC ports which made this connection easy.
Step 3: Connecting to the Comcast router in the house
This side was more fun. At the house, the conduit originally went up from the ground, into the garage, then into the attic, then all the way through the attic to the back of the house where the electric panel resides. Many bends and twists. When the electrician did his dirty work and removed everything, he left the conduit open from the ground and into the garage. That was perfect – I pulled everything through and temporarily placed the resulting cable mess on a shelf inside the garage.
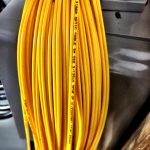
Rolled up fiber optics
Now the tricky part – connecting it to the Comcast router. Well, of course, the router is in the middle of the house. I really didn’t want to fish wires through the attic and down inside the walls. Also, there is no fiber connection on the Comcast router. So, I had to connect Ethernet between the garage and the router. The first thing I did was run new 3/4″ conduit along the fascia boards outside the house between the garage and a location close to the router (where it would enter the house – just like the Comcast cable). I ran cat-6e cable through the new conduit, through the wall into the garage and through the wall just behind the router. I added RJ45 network connectors to both and connected one side to an Ethernet port on the router.
Lesson 2: Plan where the wires go BEFORE starting
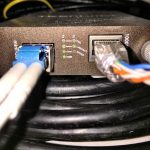
Gig-E to Fiber Media Converter
Now, into the garage. On a shelf, the fiber-optic cable (and 100 feet of it rolled up) sits, as does the ends of the Video and Ethernet cables from the barn. To hook the fiber to Ethernet, I had to purchase another magic converter from Amazon. Since this gizmo needed power, I ran an extension cord from the plug where the garage door opener is connected to the shelf. Knowing it is sensitive equipment, I decided to put an APC UPS box on the shelf to protect against surges and power outages. Anyway, I terminated the Ethernet cable, and plugged the fiber and Ethernet cable to the Fiber Media converter and watched all the lights turn green.
Anyway, I went back to the garage, plugged in my laptop to a switch on the port and viola – high speed internet service!! Wahoo.
Conclusion
Now, I have Internet service in the barn. Additionally, I have unconnected Cable TV/Video and Ethernet cables in the conduit should I decided to use them in the future. This makes me very happy. After the fiber was connected, I ran an online speed test and I’m getting close to 100Mbps download speed with over 50Mbps outbound. With virtually no latency at all. This makes me very happy!!
Now, on to my next projects – the Internet of Things!!